
Buffering
"Buffer" refers to a zone surrounding the feature on the map at a specified distance. "Buffer" is useful for analyzing the adjacency. When we would like to know the adjacency between Feature A and Feature B, besides the measurement tool, we can use "Buffer" to know whether the two features would connect within a particular distance. "Buffer" can be also applied to indicate the area around the river bank which should not be developed so that the damage caused by flood can be prevented.
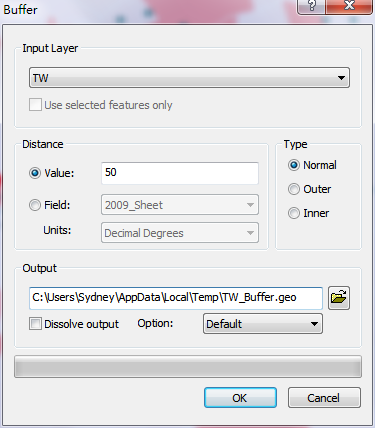
.png)
Consequently, users can perform buffer on point, line, polygon features to create buffer zone for analysis and planning. To open "Buffer" window, please click the "Tools" menu and click "Buffer."
Users can choose the layer they need from the "Input Layer" drop-down menu on the top of the "Buffer" window. Additionally, if you have selected some features, you can decide whether to tick "Use Selected Features" to perform buffer on the selected features only. If there is no selected on the input layer, "Use Selected Features" is unavailable. To set "Distance", you can choose "Value" or "Field." If you choose "Value", please type in the distance you need. The "Field' drop-down menu lists all of the numeric fields of the input layer; as the field you need is chosen, each feature will be buffered at the distance, the value in its corresponding attribute record. On the right side of "Distance", you can set the types of buffering, such as "Normal", "Outer", and "Inner." For point layers and polyline layers, you can only choose "Normal" for the buffering type. For polygon layers, you can choose "Normal", "Outer", or "Inner types." Moreover, the default path for saving Output Layer is the same as the input layer. So, you also can click ![]() to browse the new path for saving the output layer. Besides, if you tick "Dissolve Output", the system will dissolve all of the buffer features as a record; if "Dissolve Output" is not ticked, each feature will be buffered independently. In addition, users can click drop-down menu of “Option” and select “Default”, “Better Quality” or “Better Performance” according to their requirements.
to browse the new path for saving the output layer. Besides, if you tick "Dissolve Output", the system will dissolve all of the buffer features as a record; if "Dissolve Output" is not ticked, each feature will be buffered independently. In addition, users can click drop-down menu of “Option” and select “Default”, “Better Quality” or “Better Performance” according to their requirements.
Note: The default setting in the drop-down menu of “Unit” field is the same as the unit of “Layer Set”. While the unit of layer set is “Degree”, the default setting of this “Unit” field will be “Degree”, too; and the value in the “Unit” field cannot be modified by users. However, except “Degree”, users can modify other unit values like “Millimeters” or “Inches” according to their requirements. Subsequently, Desktop will automatically transform value based on unit and on the specified values users entered, and then execute buffer expression.
©2015 Supergeo Technologies Inc. All rights reserved.