
Set Time Data
As description mentioned in the previous section, using Temporal slider requires accessing time data stored in the layer property; therefore, it is necessary for a user to define time data-related settings. In Time tab, Time format is used according to its two definitions. One defined as Set each feature as a single time is applied to the situation in which features are not explained by start time and end time. For instance, a surveyor who conducts a survey of tree species would record the date/time, on which a new species was found, as well as the related information of the new-discovered tree species, instead of the start time and the end time of “finding”. The other (time format) defined as Set each feature with a start time and end time is applied to the event, which would be described by features with a start time and end time. For example, you can understand that the time on which an epidemic disease took place and the time on which the patients got recovered should be recorded to show start and end time of the disease.
Setting Fields
In Time tab, via the drop-down menu of Time Format you can define time format as “Set each feature as a single time”, then choose the data field-corresponding to the feature attribute data-you intend to display on Temporal Slider through settings in Start Time Field. On the other hand, if you define time format as “Set each feature with a start time and end time”, you would need to set start time and end time to display each feature on Temporal Slider; to do so, use settings in drop-down menus of Start Time Field and End Time Field. Please notice that you also need to set start time/end time field “formats” to have the system access time formats of the features.
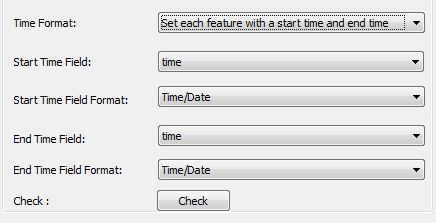
Time formats supported in Temporal Slider are:
1.YYYY 2.YYYYMM 3.YYYY/MM 4.YYYY-MM 5.YYYYMMDD 6.YYYY/MM/DD 7.YYYY-MM-DD |
1.YYYYMMDDhhmmss 2.YYYY/MM/DD hh:mm:ss 3.YYYY-MM-DD hh:mm:ss 4.YYYYMMDDhhmmss.s 5.YYYY/MM/DD hh:mm:ss 6.YYYY-MM-DD hh:mm:ss.s |
To see whether the start/end time and time format are set correctly, please click Check button after your settings are accomplihed to prevent abnormal displaying during using Temporal Slider.
Shift by Time
SuperGIS Desktop 10 also supports you to see comparison among features with different time data via animation on Temporal Slider. For example, you can shift the time data of Typhoon A to the period in which Typhoon B happened, and view the comparison result through Temporal Slider as if the two typhoons were happening at the same time. To do so, enter the value that represents the time by which you intend to shift the original time data to another period. You can shift the time data to a later period or a previous period by entering positive number or negative number.
Note: The time data stored in layer’s attribute data will not be modified through shift function. The shifted time data can only be used to display the layer it standing for on Temporal Slider.
Retain Features
This option is used to retain features that had appeared on temporal slider. If you cancel the tick of Retain Features, the expired feature data will not be retained on the display of SuperGIS Desktop while the temporal slider control snaps along the timeline and to the end time of these features. Via the example blow, see three features with different start and end times, then refer to the following table to see the differences while playing temporal slider control with/without Retain Features option.
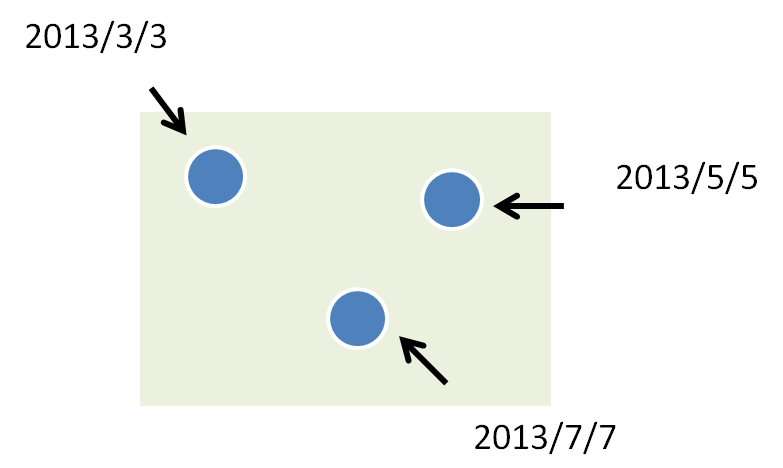
You may see this as features with time data
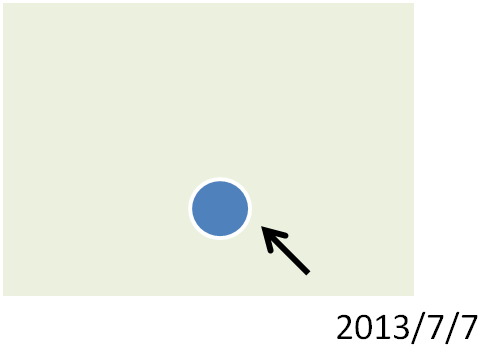
Play temporal slider control with/without features retained:
Play with features retained |
lay without features retained |
While temporal slider control stops at the time scale, July |
While temporal slider control stops at the time scale, July |
|
|
©2015 Supergeo Technologies Inc. All rights reserved.