
Image Rectification
The system can rectify image to correct position by use of control points. Map rectification takes at least four control points and the four of them should be evenly distributed to the four corners of the map. Generally speaking, the more control points lead to a more accurate result, but it is also possible that a poor rectification result is obtained due to too many control points.
Adding Control Points
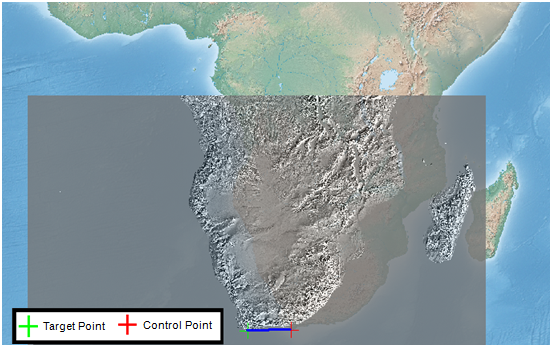
To add control points, please select the image you want to georeference on the Georeferencing toolbar and click Add Control Points tool ![]() . Then click on the map to add green target point and click again to add red control points. If Auto Adjust is checked, the display will be instantaneously updated and the target point will be shifting approaching the control points; if not checked, the image remains but the target points and control points can still be seen, and a blue line connecting target points of the same group and control points will show.
. Then click on the map to add green target point and click again to add red control points. If Auto Adjust is checked, the display will be instantaneously updated and the target point will be shifting approaching the control points; if not checked, the image remains but the target points and control points can still be seen, and a blue line connecting target points of the same group and control points will show.
Deleting Control Points
To delete control points, please click Georeferencing > Delete Control Points to delete all control points. Or you can click Control Points List ![]() to delete control points, please refer to Management of Control Points.
to delete control points, please refer to Management of Control Points.
Management of Control Points
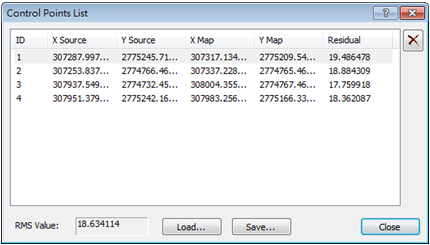
Users can use the control point list tool ![]() to manage all the control points, including delete existing control points, save all the control points, or load control points. The information related to the control points are shown in the control point list, including its source coordinates, map coordinates, and residual. These information can help to evaluate the accuracy of the geo-referencing.
to manage all the control points, including delete existing control points, save all the control points, or load control points. The information related to the control points are shown in the control point list, including its source coordinates, map coordinates, and residual. These information can help to evaluate the accuracy of the geo-referencing.
To save the control points, press Save… . Pressing Load… can read all existing files of control points. To delete control points, select the ones to delete on the list and press ![]() to delete them.
to delete them.
Starting to Rectify
According to the number of control points, you can select different types of transformation polynomial. Three types of polynomial are provided in SuperGIS Desktop 10, 1st Order Polynomial can be applied whenever control points are added; 2nd Order Polynomial can be applied as the number of control points is 6 and over; 3rd Order Polynomial can be applied as the number of control points is 10 and over. The different Polynomial can be applied to reduce the residual between target point and control point to enhance the precision. Select different polynomials by clicking Georeferencing>Trasformation.
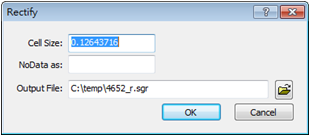
After control points and polynomial are confirmed, please click Georeferencing>Rectify to start to rectify. In Cell Size input the cell size of the output cell, in NoData as input the output value for cells of no data, the default is no value, which means NoData in source cells will remain NoData in the output cells; if the field has a value input, the new cell value that used to be NoData will be replaced by such defined value. At last, enter the path for output file in Output File and press OK.
©2015 Supergeo Technologies Inc. All rights reserved.