
Create COGO lines
The COGO tool provides users different ways to create new COGO lines, including Traverse, 2-Point Line, Offset Line, Cul-De-Sac, and Split Line Proportionally. To use the COGO tool, users should have at least one line layer added to the SuperGIS Desktop and enable the edit mode with the line layer as the target layer.
Traverse
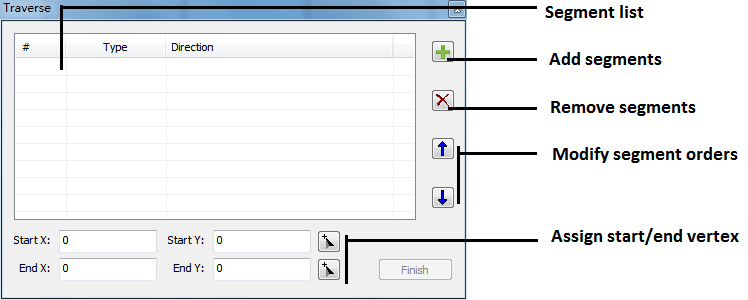
If the survey measurements collected from the field are in the form of directions and distances, angles and distances, or curves, they are called traverse. Click the Traverse icon ![]() to open Traverse window, which shows the segment list of the new line feature. Users can assign the start/end vertex of the new line feature by typing into its X,Y coordinates or clicking
to open Traverse window, which shows the segment list of the new line feature. Users can assign the start/end vertex of the new line feature by typing into its X,Y coordinates or clicking ![]() to click on the map. And then click
to click on the map. And then click![]() to add a line segment. The traverse tool allows users to add straight lines or curves by using Direction-Distance, Angle-Distance, Curve, and Tangent Curve ways.
to add a line segment. The traverse tool allows users to add straight lines or curves by using Direction-Distance, Angle-Distance, Curve, and Tangent Curve ways.
Direction-Distance
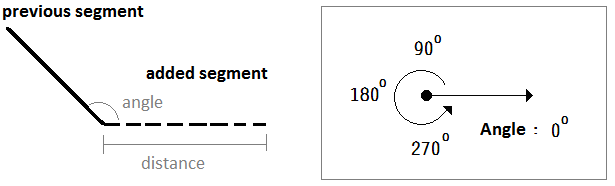
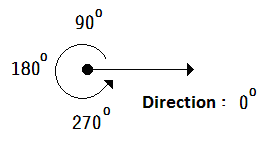
At least one start/end vertex should be assigned before using Direction-Distance. Users provide the direction and the distance of the segment, and then click Done to add the segment. The unit of the distance is the same as the map unit, and the direction begins from the East direction and increases counter-clockwise.

Angle-Distance
Angle-Distance allows users to add a segment by assigning the distance and the angle between the previous segment and the added segment. The angle increases counter-clockwise. If no previous segment exists in the segment list, then the angle begins from the East direction and increases counter-clockwise.
Curve
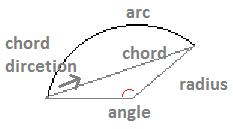
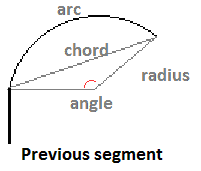
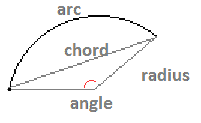
To add a curve, at least one start/end vertex should be assigned. Users should provide 3 measurements of the curve to determine a new one, including its angle, chord, chord direction, radius, arc, radius direction, or tangent direction. The angle is the center angle; the chord is the distance between the endpoints of the curve; the chord direction is the direction from the start vertex to the end vertex, as shown below. Users can use the curve calculate to calculate the needed information.
Tangent Curve
Users provide 2 measurement of the curve to determine a new one, including its angle, chord, chord direction, or radius. Users can use the curve calculate to calculate the needed information.
2-Point Line
Users may use the 2-Point Line tool if they want to add lines between existing features. The tool needs a start point, which can be set by inputting the coordinates, clicking on the map, or using the coordinates of the start/end vertex of a selected line. Then users can use 4 different ways to add the line, including Direction-Distance, Angle-Distance, Curve, and Tangent Curve.
Direction-Distance
Users provide the direction and the distance of the added line. The unit of the distance is the same as the map unit, and the direction begins from the East direction and increases counter-clockwise.
Angle-Distance
Before using Angle-Distance, please click Type dropdown arrow and select Angle-Distance in the dropdown menu and then you can specify the start point of the new line in Enter base point. Here you can decide the start and end points by coordinate or by selected line. If choosing by coordinate, you can directly input the X, Y coordinates or press ![]() and click on the map to specify the coordinates and direction; if choosing by selected line, please select one line feature and specify its start point or end point to be the start point of the new line, the direction of new line is the same as the source line’s. Right after the coordinates of the start point has been defined, enter the Direction and Distance in Segment, and press Add to finish creation.
and click on the map to specify the coordinates and direction; if choosing by selected line, please select one line feature and specify its start point or end point to be the start point of the new line, the direction of new line is the same as the source line’s. Right after the coordinates of the start point has been defined, enter the Direction and Distance in Segment, and press Add to finish creation.
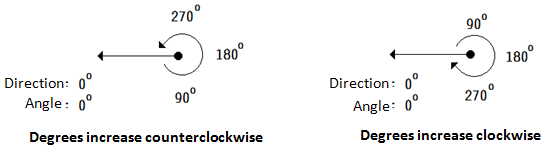
NOTE: The picture below illustrates the start direction of Direction and Angle, and the directions represented by different values. The direction or angle value can be out of the range of 0-360 degrees.
Curve
To add a curve, users should provide 3 measurements of the curve to determine a new one, including its angle, chord, chord direction, or radius. The angle is the center angle; the chord is the distance between the endpoints of the curve; the chord direction is the direction from the start vertex to the end vertex, as shown below. Users can use the curve calculate to calculate the needed information.

Tangent Curve
Users provide 2 measurement of the curve to determine a new one, including its angle, chord, chord direction, or radius.
Offset Line
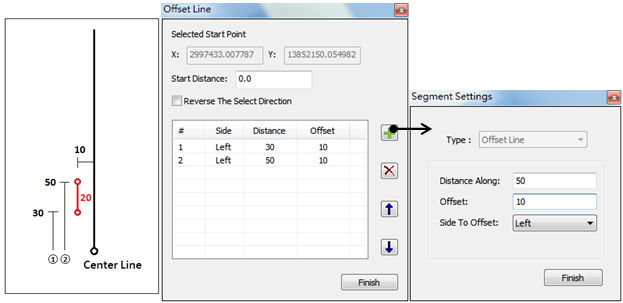
Users may use the Offset Line tool if they have a strip description survey plan, which describes boundaries on either side of a specified centerline. To use the Offset Line tool, users should first select a centerline, and then click ![]() to open the Offset Line window. Enter the location of the added vertexes by clicking
to open the Offset Line window. Enter the location of the added vertexes by clicking ![]() to enter the distance of the vertex to the start point (Distance Along), the distance to the centerline (Offset), and the side of the vertex to the centerline (Side To Offset). Users can also use
to enter the distance of the vertex to the start point (Distance Along), the distance to the centerline (Offset), and the side of the vertex to the centerline (Side To Offset). Users can also use ![]() to remove a selected vertex from the list, or use
to remove a selected vertex from the list, or use ![]() and
and ![]() to modify the order of the vertex in the list.
to modify the order of the vertex in the list.
For example, you want to add a line on the left side of the centerline whose length is 20 units, and is 10 units away from the centerline, 30 units away from the start point. You can first add the first vertex with parameters 'Distance Along' = 30, 'Offset' = 10, and 'Side To Offset' = Left. And add the second vertex with parameters 'Distance Along' = 50, 'Offset' = 10, and 'Side To Offset' = Left, as shown in the figure below.
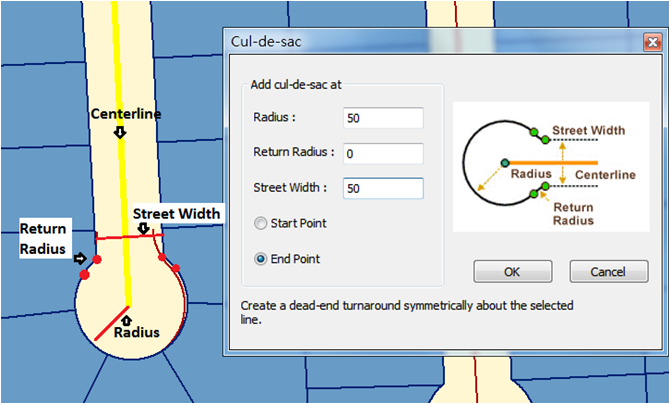
Cal-De-Sac
The Cal-De-Sac tool helps users to create a circular turnaround in a dead-end street or alley. Click ![]() to open Cul-de-sac window, and provide the width of the street, the radius of the circular turnaround, and the return radius, and the Cal-De-Sac tool can help to create a precise circular line feature representing the turnaround, as shown in the figure below.
to open Cul-de-sac window, and provide the width of the street, the radius of the circular turnaround, and the return radius, and the Cal-De-Sac tool can help to create a precise circular line feature representing the turnaround, as shown in the figure below.
Split Line Proportionally
The Split Line Proportionally tool helps to split line features into segments proportionally, based on the segment proportions provided. To use this tool, users should first select a line feature, and then click ![]() to open Split Line Proportionally window. Users can click <Click To Enter Length Proportion> to enter a proportion of a new segment, or click
to open Split Line Proportionally window. Users can click <Click To Enter Length Proportion> to enter a proportion of a new segment, or click ![]() to enter the number of the segments needed. Users can also use
to enter the number of the segments needed. Users can also use ![]() to remove a selected segment from the list, or use
to remove a selected segment from the list, or use ![]() and
and ![]() to modify the order of the segments in the list.
to modify the order of the segments in the list.
For example, you want to split a road feature into 2 segments. The road length is 497.334471 meters. According to the survey result, the length of the first segment is 250.80; the length of the other segment is 246.50. The summation of the two is 497.30, but the actual road length is 497.334471. Therefore, the proportioned length of the two segments will be 250.817385 and 246.517087 respectively.
Create COGO lines using existing line features
The COGO lines are either totally straight or circular. Users can use the Convert into COGO lines tool to turn line features into COGO line features. To do so, select any line feature needed to be converted into COGO lines, and click ![]() .
.
©2015 Supergeo Technologies Inc. All rights reserved.