
Add Parcel Features
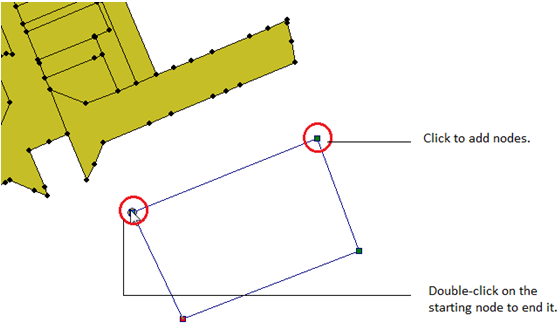
You can add a new parcel polygon or line (arc) feature. To add a parcel polygon, click on Create Parcel Features ![]() . Then click on the map to add nodes and draw the boarder of the polygon. The added feature will be assigned to the recently used plan. Or you can use Select Features tool, and right-click on the feature in the Parcel Explorer and select New in group, and the added feature will be assign to the plan the same as the selected parcel feature. You can also add parcel features by first assigning its associated plan. Open the Plan Directory window and right-click on the plan you want to assign to and click New Parcel. After finishing drawing the polygon, double click on the starting node to end drawing. Please note that the polygon must be a closed geometry, as shown in the figure below.
. Then click on the map to add nodes and draw the boarder of the polygon. The added feature will be assigned to the recently used plan. Or you can use Select Features tool, and right-click on the feature in the Parcel Explorer and select New in group, and the added feature will be assign to the plan the same as the selected parcel feature. You can also add parcel features by first assigning its associated plan. Open the Plan Directory window and right-click on the plan you want to assign to and click New Parcel. After finishing drawing the polygon, double click on the starting node to end drawing. Please note that the polygon must be a closed geometry, as shown in the figure below.
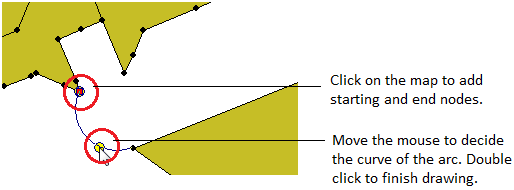
You can also add an arc as a parcel feature’s edge. To add an arc, click on Arc Tool ![]() . Click on the map to add the starting node, and click again to add the end node. Then move your mouse to decide the curve of the arc feature and click again to finish drawing, as shown in the figure below.
. Click on the map to add the starting node, and click again to add the end node. Then move your mouse to decide the curve of the arc feature and click again to finish drawing, as shown in the figure below.
When adding nodes, the added nodes will be automatically snapped to the closest existing nodes or edges if your mouse is within a certain distance to those nodes or edges.
In addition to clicking on the map, you can use other tools to add a new node, including Offset XY Tool, Distance Tool, Direction Tool, Parallel Tool, Perpendicular Tool, Distance-Distance Tool, and Direction-Distance Tool. To use these tools, you need to add a new node by using Create Parcel Features tool or Arc Tool first. Then use the mentioned tools to add the next node.
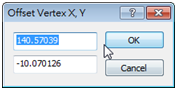
Offset XY Tool
To use Offset Tool, right-click on the previous added node and select Offset XY. Then enter the X, Y coordinates of the offset vertex and click OK to add the next node.
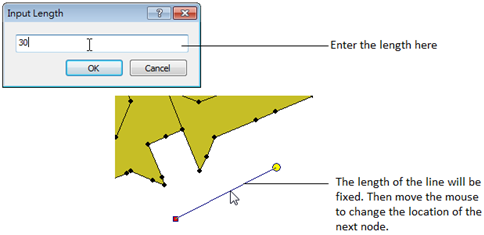
Distance Tool
To use Distance Tool, select Land Parcel > Distance, or right-click anywhere on the map and select Length. Enter the length of added edge and move your mouse to decide the location of the next node. Then click again to add the node. Refer to the figure below for instructions.
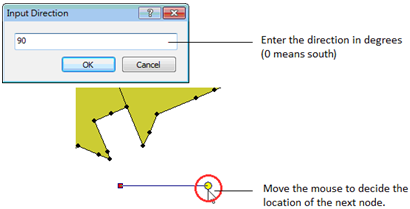
Direction Tool
To use Direction Tool, select Land Parcel > Direction, or right-click anywhere on the map and select Direction. Enter the direction of the added edge and move your mouse to decide the location of the next node. Then click again to add the node. Refer to the figure below for instructions.
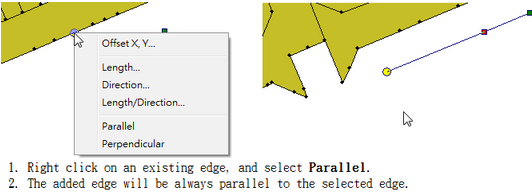
Parallel Tool
Parallel Tool can let you add a new edge which is parallel to an existing edge. To use it, simply right-click on the edge you want the add edge be parallel to. Then you can see the added line will be always parallel to that edge wherever you mouse moves, as shown in the figure below.
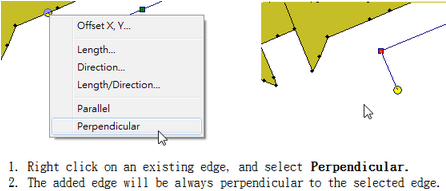
Perpendicular Tool
Perpendicular Tool can let you add a new edge which is perpendicular to an existing edge. To use it, simply right-click on the edge you want the add edge be perpendicular to. Then you can see the added line will be always perpendicular to that edge wherever you mouse moves, as shown in the figure below.
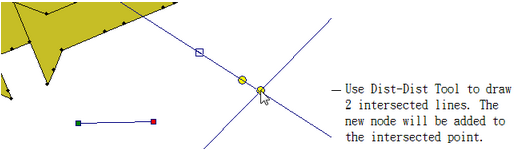
Distance-Distance Tool
To use Distance-Distance Tool, click on the tool icon ![]() , and draw 2 intersected lines by clicking on the map. The new nodes will be added to the intersected point. Refer to the figure below for instructions.
, and draw 2 intersected lines by clicking on the map. The new nodes will be added to the intersected point. Refer to the figure below for instructions.
Direction-Distance Tool
To use Direction-Distance, click on the tool icon ![]() , and draw a line and a circle by clicking on the map. The line and the circle should be intersected. Then you have to decide which intersection point to be the location of the next node. Refer to the figure below for instructions.
, and draw a line and a circle by clicking on the map. The line and the circle should be intersected. Then you have to decide which intersection point to be the location of the next node. Refer to the figure below for instructions.
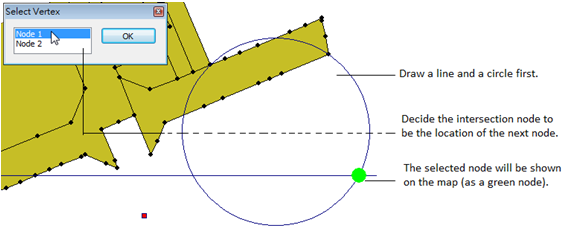
Or, you can right-click anywhere on the map and select Length/Direction. Then enter the length and direction to determine the location of the next node.
©2015 Supergeo Technologies Inc. All rights reserved.