
Snap Setting
Snap can facilitate users to precisely connect to an existing feature. For example, when you need to add a new subway route from a subway station, you need to make sure that the route and the station are accurately connected. Snap can help you to complete the task easily. Snapping can be used with various editing tools to help you add, edit, or even cut features accurately.
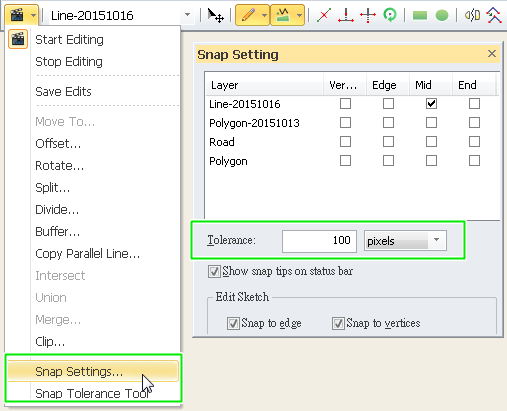
First of all, you can click the drop-down arrow next to "Start Editing" on "Edit" toolbar and then click "Snap Setting." Then, "Snap Setting" window displays. In the window, you can set snap elements and the tolerance. Snapping Tolerance is a specified distance which will be the radius of the mouse cursor when the snapping is set. While the mouse cursor is moving in the map window, snap elements within the radius will be snapped by the mouse cursor automatically. In other words, when you are adding new features and the distance between the mouse cursor and the existing feature is the snap tolerance, the system will automatically match the feature and the mouse cursor. In "Snapping Setting" window, you can key in the tolerance and choose the unit as pixels or map units.
Snap elements means the part of the feature you would like to snap; you can choose vertex, edge, midpoint, and endpoint as snap elements. For example, in order to make the new subway route connect to the vertex of the station, users need to tick "Vertex" of the layer of the station. As a result, when users sketch a line segment and the vertex of the station is within the tolerance, the mouse cursor will be automatically snapped to the vertex. Since an edge is composed of multiple vertices, ticking "Edge" as the snapping element means that Vertex, Midpoint, and Endpoint are included in the snapping elements; ticking "Vertex" means "Midpoint" and "Endpoint" are included.
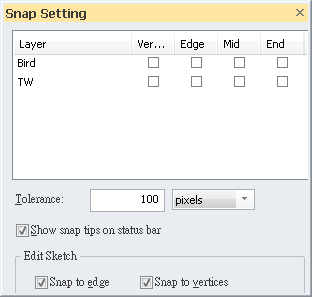
Vertex: snapping to vertices of each features of the layer
Edge: snapping to edged of each features of the layer
Midpoint: snapping to the middle point between two points on a edge
Endpoint: snapping to the first point and the last point of a line segment
The snapping status of the current editing layer can be set to be shown on the status bar at the lower left corner by checking “Show snap tips on status bar.” See the figure below, the status bar shows “Road: Mid”, it means the feature in editing is snapping to the midpoint of the ROAD layer; through the status bar users can get whether the feature in editing is snapping to the correct position. “Edit Sketch” mainly sets the snapping settings for features which have not been digitized yet (features in digitizing); two options are available: snap to edge and snap to vertices.

•Tolerance Tool
”Snap Tolerance Tool”, the last item in the “Start Editing” drop-down menu, will be given with a check after it is clicked. The cross cursor will appear when mouse moves on the map; in the meantime, users can drag a circle and decide the tolerance based on the radius. As a circle is finished, the tolerance for snapping setting will change as well, and the tolerance value might change according to the unit. If the mouse is pressed and released at the same point, no circle will be sketched on the map, so the tolerance will be set 0.
©2015 Supergeo Technologies Inc. All rights reserved.