
Edit Toolbar
1.Start Editing
2.Edit Target
3.Select Features
4.Sketch Tool
5.Editing Mode
6.Split Tool
7.Extend Tool
8.Trim Tool
9.Rotate Features
10.Rectangle Tool
11.Circle Tool
12.Separate Part
13.Generalize Tool
14.Smooth Tool
15.Edit Attributes
16.Edit Geometry
•Select Features Tool
After clicking “Start Editing”, “Select Features” tool ![]() will be selected automatically. Then, you can click the feature you would like to edit and make changes to it. If you select “Add New Features” or other editing modes, you still can use “Select Features” tool to select and edit features at the same time.
will be selected automatically. Then, you can click the feature you would like to edit and make changes to it. If you select “Add New Features” or other editing modes, you still can use “Select Features” tool to select and edit features at the same time.
•Editing Tools
When you need to edit features, you can select “Editing Tools![]() ” on Edit toolbar, click the drop-down arrow, and select the tool you need. The editing tools provided by SuperGIS Desktop 3 include Sketch Tool
” on Edit toolbar, click the drop-down arrow, and select the tool you need. The editing tools provided by SuperGIS Desktop 3 include Sketch Tool![]() , Midpoint Tool
, Midpoint Tool ![]() , Nearest Distance Tool
, Nearest Distance Tool ![]() , Intersection Tool
, Intersection Tool ![]() , Arc Tool
, Arc Tool![]() , Distance-Distance Tool
, Distance-Distance Tool ![]() and Direction-Distance Tool
and Direction-Distance Tool ![]() , each of which may be applied to different geometry types and functions. The editing tools cooperating with various editing modes, such as adding new features, cut features, etc, can produce different effects. Thus, this chapter is going to introduce the methods to utilize the editing tools with editing modes in detail. The descriptions of the tools are introduced in the following table.
, each of which may be applied to different geometry types and functions. The editing tools cooperating with various editing modes, such as adding new features, cut features, etc, can produce different effects. Thus, this chapter is going to introduce the methods to utilize the editing tools with editing modes in detail. The descriptions of the tools are introduced in the following table.
Tools |
Descriptions |
Sketch Tool |
The method to use Sketch Tool is to click on the map window, move the mouse to sketch, and double-click to finish sketch (or right-click and click Finish Sketch to complete the current action). |
Midpoint Tool |
Midpoint Tool can facilitate users to create a point at the middle of a line segment; you can click to set the first point of the line segment and click again to set the other point, and then the midpoint is added. If you would like to use Midpoint Tool to create a line or polygon, you can repeat the actions described above and double-click the last vertex or right-click and click Finish Sketch on the menu to finish the sketch. |
Nearest Distance Tool |
When you want to edit a nearest distance between a vertex and a line segment, you can apply Midpoint Tool. When you utilize Midpoint Tool to sketch line features, the first vertex is the midpoint of the line segment you sketch. Then, you can sketch another line segment, and the next vertex will be the point of vertical intersection of the last vertex and the line segment. And you can repeat the movement until the line feature is finished. The way to end the sketch is the same as other editing tools (double-click the last vertex or right-click and click Finish Sketch on the menu to finish the sketch). |
Intersection Tool |
Add a vertex at the intersection of two digitized line, it is able to find the intersection of features. |
Arc Tool |
It is suitable for creating line and polygon features. Create a line, move mouse to make the line become an arc. Then, finish the sketch by double-click or right-click and select “Finish Sketch.” |
Distance-Distance Tool |
Digitize two circles that intersect at two points and select one of the intersections as the vertex. Please note that if the two digitized circles do not intersect each other, no vertex will be generated, so you will need to re-digitize the circles. |
Direction-Distance Tool |
Digitize one straight line and one circle, and they should intersect at two points; then, select one of them as the vertex. When digitizing a straight line, you can rotate the line and set its direction. Next, digitize a circle that must intersect the straight line. If there is no intersection, you will need to digitize again. |
•Editing Modes
Several editing modes are provided in SuperGIS Desktop 3 for users to choose as necessary. Editing modes include Add New Features![]() , Modify Features
, Modify Features![]() , Cut Features
, Cut Features ![]() , Extend/Trim Features
, Extend/Trim Features ![]() , Mirror Features
, Mirror Features ![]() , Reshape Features
, Reshape Features ![]() , Auto-Complete Polygon
, Auto-Complete Polygon ![]() , Select Features by Polyline
, Select Features by Polyline ![]() , and Select Features by Polygon
, and Select Features by Polygon ![]() . Since the effects produced by each editing mode and editing tool are complicated, the manipulations and effects will be introduced in detail in Editing Modes Menu.
. Since the effects produced by each editing mode and editing tool are complicated, the manipulations and effects will be introduced in detail in Editing Modes Menu.
Modes |
Descriptions |
Add New Features |
Add Features can add point, polyline, or polygon features according to the editing tools and the layer you choose. |
Modify Features |
Modify Features is able to edit the vertices of features with the editing tool users select. |
Cut Features |
Cut Features can cut polyline features and polygon features. |
Extend/Trim Features |
Extend/Trim Features can only change the length of polyline features, so it has no effect on point features or polygon features. Meanwhile, Extend/Trim Features changes the length of features in different ways by using various editing tools. |
Mirror Features |
Mirror Features can create a mirror image of selected feature(s) on the other side of the line you create; the tool can be applied to create streetlights or buildings on the roadside. All you need to do is create or select feature(s) and sketch a line segment with Mirror Features, and the new feature(s) will be added. |
Reshape Features |
“Reshape feature” is similar to “Cut Feature” and “Auto Complete Polygon” in manipulation. Reshape Feature can efficiently edit a single feature in a way that by cutting features with a line. Please note that when you are reshaping features, the sketched line for cutting feature cannot intersect itself. |
|
there must be lots of common boundaries of polygons when you sketch street blocks, territories, districts, etc. You can use Auto-Complete Polygon tool to avoid that the polygons do not share the boundaries with other existing polygons. |
Select Features by Polyline |
Select Features by Polyline tool can select the features intersecting the line segment you construct. |
Select Features by Polygon |
Select Features by Polygons tool can select the features intersecting the polygons you construct. Users can use the two modes with each editing tool to select features. |
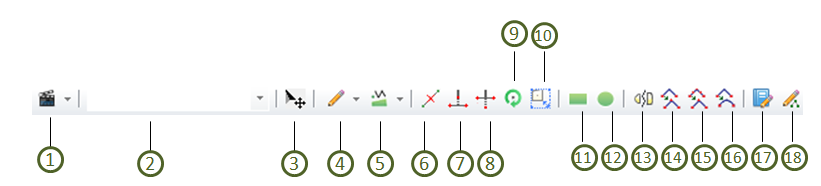
•Other Tools
In addition to the editing tools discussed above, the Edit Toolbar contains other tools else, such as Split Tool ![]() , Extend Tool
, Extend Tool ![]() , Trim
, Trim ![]() , Rotate
, Rotate ![]() , Rectangle Tool
, Rectangle Tool ![]() , Circle Tool
, Circle Tool![]() , Separate Parts
, Separate Parts ![]() , Split at Vertex
, Split at Vertex ![]() , Generalize Tool
, Generalize Tool ![]() , Smooth Tool
, Smooth Tool ![]() , Edit Attributes
, Edit Attributes ![]() , Edit Geography
, Edit Geography ![]() .
.
Tools |
Descriptions |
Split Tool |
Split Tool can split a polyline feature into two parts. Split Tool can be used only when one polyline feature is selected; the tool does not work as more than one polyline features selected. |
Extend Tool |
Function of Extending Tool is to extend line features. A segment extends and then generates a vertex at its first intersection with another line feature or with the edge of a polygon feature. However, if the extended segment does not intersect with the selected feature(s), the manipulation will be invalid. |
Trim |
The function, “Trim”, enables users to trim the selected features. It has similar logic with the edit tool extend. Line intersections and midpoint of the trimmed line are for users to decide which segment to trim. But the tool will be functionless if no intersection is formed. |
Rotate |
“Rotate” can rotate features; you can select a feature and Rotate tool, then move the mouse cursor over the selected feature, click and drag the feature to the desired orientation. Then, the orientation of the feature is changed. |
Rectangle Tool |
Users can select “Rectangle Tool”, click on the map window, drag a rectangle and double-click to finish sketch (or right-click and click “Finish Sketch” to complete the current action). |
Circle Tool |
Users can select “Circle Tool”, click on the map window, drag a circle and double-click to finish sketch (or right-click and click “Finish Sketch” to complete the current action). |
Separate Parts |
Separate Parts can be used to separate multipart features, including points, polylines, and polygons. |
Split at Vertex |
”Split at Vertex” helps to divide a line with multiple vertices into multiple straight lines with only two end vertices. Please note that it works only on polyline features, which means that the target layer must be line layer for users to edit. |
Generalize Tool |
”Generalize Tool” is to generalize polyline and polygon features with rather complicated line or outline. Users enter the “Maximum Allowable Offset” and click “OK”, the selected feature will be generalized. |
Smooth Tool |
“Smooth Toll” is to smooth the line or outline of polyline and polygon features. Users enter the “Maximum Allowance Offset” and click “OK”, the select feature will be smoothed. |
Edit Attributes |
if you would like to edit the attributes of some feature, you can select a feature and click Edit Attributes to display Edit Attribute window. You can click the values and enter the values in the window directly and click the upper-right |
Edit Geography |
When you have selected some feature, you can click Edit Geography tool to display Edit Vertex window in which all the coordinates of the vertices are recorded. If you click some record in the window, the vertex will be displayed as white on the map window. Moreover, you can double-click the coordinate column in the window and enter editing status, and you can enter the values directly. After finishing editing, click Finish Sketch on the lower-right corner of the window. |
©2015 Supergeo Technologies Inc. All rights reserved.