
Relating and Joining Table
The "Relate and Join" tab in Layer Properties window enables users to relate or join the attribute table with other attribute table. Relating tables is to relate the common attributes of the two layers and make the relationship. So when you identify features of one of the layers, the "Identify" window will not only show the data of the feature recorded in the layer but also the data of the feature recorded in the other layer.
Moreover, Joining tables is to join two layers' tables based on a specified attribute field (the fields' properties must be the same, while the field name and the order of attributes are not necessary the same). The system joins the target table to the source table according to the specified field. The target attribute table will be joined to the source table according to the assigned fields, which will create a new attribute table. Joining table can be also applied to feature identification. While users are identifying features, the corresponding attributes will also be displayed in the "Identify" window. Furthermore, the joined attribute table can be exported as well.
To relate tables, right-click on the target layer and click properties, and then switch to Relate and Join tab. Click Add to open Relate window. Select the field used to perform relate in the Source Fields section. Then select the target table from the Table lists and the field to use from the Fields list in the Relate Target section. If the table you need does not exist in the table list, you can click the open file icon the choose the table you need (SuperGIS Desktop 3 supports Excel table as the relate target). After all the tables and fields are provided, click OK to proceed.
.png)
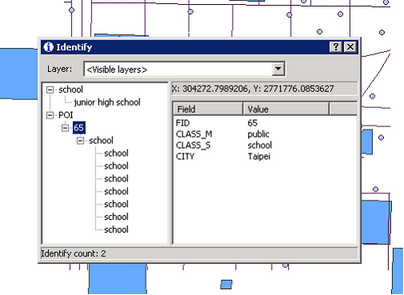
Back to the map window, select the "Identify" tool on "Tools" toolbar and click a feature of the source layer. Since we have related the source layer whose attribute table contains “school”, click a school in POI layer and the "Identify" window appears. In the left column of the window, you can see the feature listed below POI. In this sample, we click “school.” There is a class below the feature; the class is the layer you choose as the relate target, “school” layer. The class below “school” shows the features of schools.
The settings of Join can be set in the tab as well. Firstly, choose a field in "Source Field" and assign the field as the join field. In "Join Target", choose the target you want to join. If the layer you need is not in the "Table" list in "Join Target", you can click "Open" ![]() to choose the file you need. The file you choose can be vector file, *.dbf file or *.xls file. Then, choose a field which has the common attributes with source field in "Field." Then, Click "OK"to finish the settings.
to choose the file you need. The file you choose can be vector file, *.dbf file or *.xls file. Then, choose a field which has the common attributes with source field in "Field." Then, Click "OK"to finish the settings.
.png)
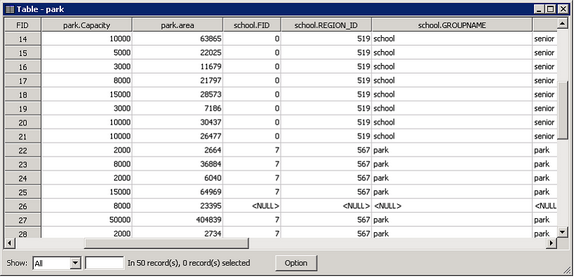
Open the attribute table of Source Layer, and you can find besides the fields of the source layer there are some new fields. In order to distinguish which layer the fields belong to, each field name will become “layer name (or filename).field name.” Take the table for example. The attribute table is the result of joining “poi” layer and “school” layer. The current attribute table shows the corresponding data. <NULL> means no data but not blank. The black cell means the record is blank but not no data.
©2015 Supergeo Technologies Inc. All rights reserved.